At a Glance
- Cannabis consignment receiving in ShelfSpace happens at delivery creation. Pick
Order Type = Consignmentto send the delivery through the consignment settlement engine. - The same vendor can ship a consignment delivery and a wholesale delivery on the same day. Each one is its own invoice, its own Metrc manifest, its own Order Type.
- Configure the vendor once: Master Vendor Split, Operational Discount Budget, per-category splits, and Settlement Frequency. Every consignment delivery and settlement from that vendor inherits those settings.
- Receiving is the same three-step flow on every delivery: upload signed invoice and Metrc manifest, confirm physical line items, confirm invoice total.
- Payday is one click on the Consignment Payments tab. Approve & Pay tells the platform to cut a Check 21 from your bank. Mark as paid externally records that you paid the vendor your own way.
Consignment is the lever that lets a cannabis dispensary carry more SKUs, take a chance on emerging brands, and stop paying for inventory before it sells. The mechanics are simple. The operational tracking is not — at least, not on a spreadsheet, and not on generic ERP software. ShelfSpace was built specifically to handle the cannabis-specific layer: the Metrc reconciliation, the per-vendor per-category profit split math, the weekly POS roll-up, the Check 21 payment, the vendor portal. This page is the operator-facing SOP for receiving a consignment delivery from a vendor you've already brought onto the platform, and turning that delivery into a paid settlement.
If you're earlier in the journey and you're still deciding which vendors to bring on or how to structure the conversation, start with the getting-started guide or the consignment service page. This doc picks up where those leave off — the vendor has agreed, the contract is signed, the product is heading to your dock.
Step 1 — Confirm your vendor is set up correctly
Open the platform, click Vendors in the left nav, and select the vendor whose consignment delivery you're about to receive. The vendor detail page opens on the Settings tab.
Every vendor in ShelfSpace has two settings panels stacked on one screen — Wholesale Settings (the payment terms for product you buy outright via AP) and Consignment Settings (the profit splits, the discount cap, the rules for product you carry on consignment). If a vendor only does one mode with you, the other panel sits empty. Most relationships start with one panel filled and grow into both.
The two settings that do the heaviest lifting in the consignment math:
- Master Vendor Split — the default percentage of net sales the vendor keeps, expressed as vendor% / retailer%. This is the fallback applied to any category that doesn't have its own split. A 50/50 split is where most relationships start; you and the vendor negotiate up or down from there based on category, volume, and how hard the brand is to source.
- Operational Discount Budget — the daily-discount budget the vendor is willing to fund. Discounts you run at the register (manager comps, happy hour, customer loyalty pricing) eat into the vendor's share up to this budget. Anything beyond the budget is on you. ShelfSpace ships with a 12.5% default, which is roughly the day-to-day discounting most stores run; adjust per vendor as your conversations unfold.
Below those, the per-category splits let you negotiate one number for Flower, a different number for Pre-Rolls, a different number for Concentrates, and so on. This matters because a vendor's margin economics aren't the same across their catalog. If a brand sells a flagship flower at razor-thin wholesale margin but ships an infused pre-roll at a healthier margin, your splits should reflect that.
One more setting lives on its own card on the same Settings tab: Settlement Frequency — how often the platform runs this vendor's settlement. Pick Weekly (prior Mon–Sun), Biweekly (14 days), or Monthly (prior calendar month). Weekly is the default, and a change applies to future runs only — an open period finishes on its current cadence.
If the vendor isn't in the platform yet, click Add Vendors on the Vendors page and run the onboarding flow. The first time you load a vendor, the platform creates a partnership record with both panels available, so you can start consignment-only and add wholesale terms later (or vice versa) without re-onboarding.
Step 2 — Coordinate the delivery with the vendor
This is the discipline step. Tell the vendor — explicitly — that the consignment portion of any shipment needs its own paperwork. One Order Type per delivery in ShelfSpace means one invoice, one Metrc manifest, one chain of custody per delivery record.
If the same vendor wants to bring you a wholesale order and a consignment order on the same trip, ask them to write two invoices and pull two Metrc manifests — one for each. They drop both off at your dock; you create two deliveries in ShelfSpace, designating one as Wholesale and one as Consignment. Each one runs through its own settlement track from that point forward.
Step 3 — Create the delivery and designate Order Type
When the vendor arrives at the dock, click Deliveries in the left nav, then click the + Create Delivery button in the top right of the Deliveries page.
A delivery can also arrive on its own — ShelfiQ ingests a vendor's emailed invoice and pre-fills a delivery for you to review on the Incoming tab. This SOP covers the manual + Create Delivery path; the fields are the same either way.
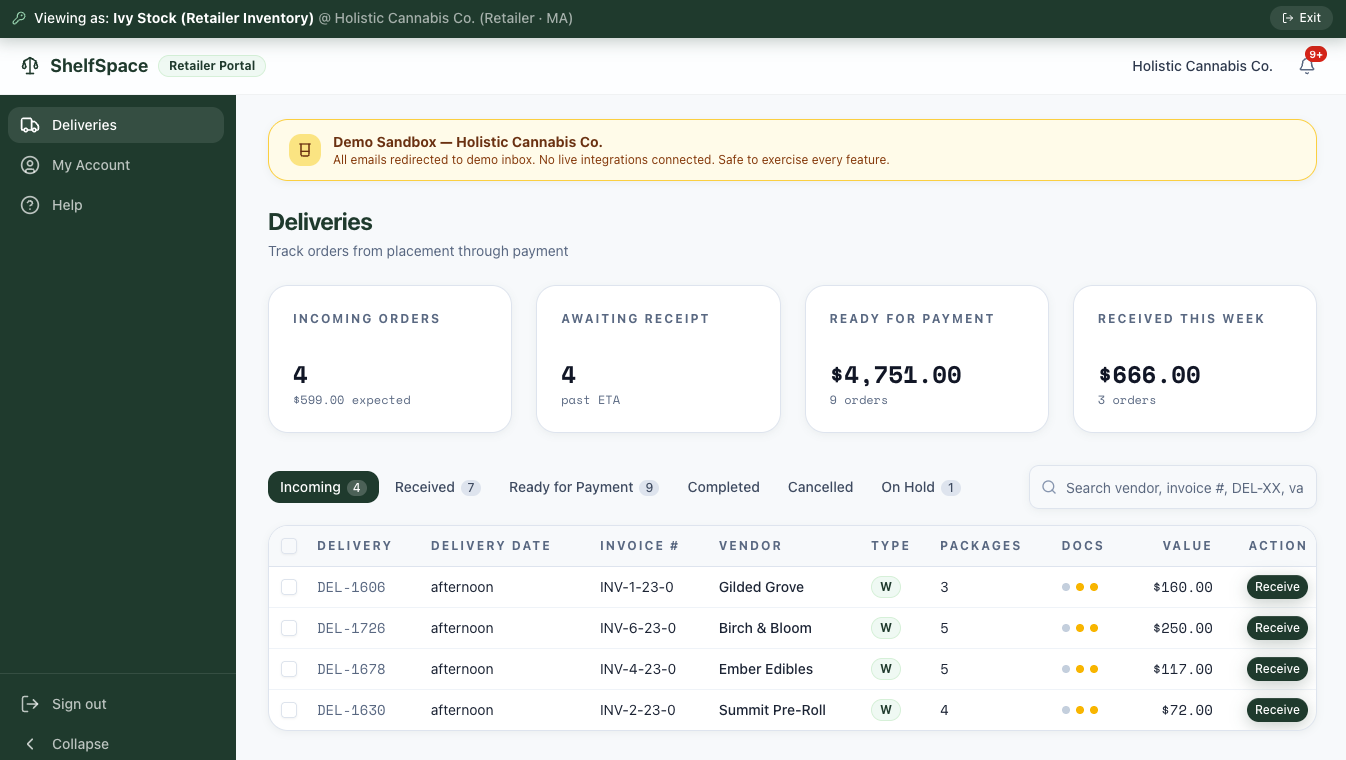
The Create Delivery dialog opens. Two ways to fill it in:
- Drag and drop the vendor's invoice PDF into the Upload Invoice zone at the top. ShelfiQ parses the file, identifies the vendor, and auto-fills the rest of the form — vendor name, invoice number, delivery date, package count, and dollar total.
- Type it in manually if you don't have the invoice as a PDF. The form accepts vendor, invoice #, delivery date, package count, order value, and procurement notes.
Either way, the load-bearing field is Order Type. It's a two-button toggle right below the Vendor selector. Default is unselected — you must pick one before the form will submit.
Tap Consignment for any delivery where the vendor retains ownership until the product sells. Tap Wholesale for any delivery you're buying outright on AP terms (COD, Net 30, Net 60, etc.).
Click Consignment, verify the rest of the fields, and click Create Delivery. The new delivery lands in the Incoming tab tagged with a blue C (wholesale rows show a W), and a Docs column shows yellow dots for the documents still to upload during receipt.
Step 4 — Receive the delivery (three steps in the Receive flow, then mark it complete)
When the physical delivery is sitting at the dock, find the row in the Incoming tab and click Receive on the right side of the row.
The Receive flow is identical between wholesale and consignment — same three steps, same dialogs, same validation. What changes is what happens after: a consignment-tagged delivery feeds the weekly settlement engine, a wholesale-tagged delivery feeds the AP invoice queue. We're showing the dialogs below from a wholesale receipt because the rendering is the same; you'll see your own vendor name, line items, and dollar total when you run it on consignment.
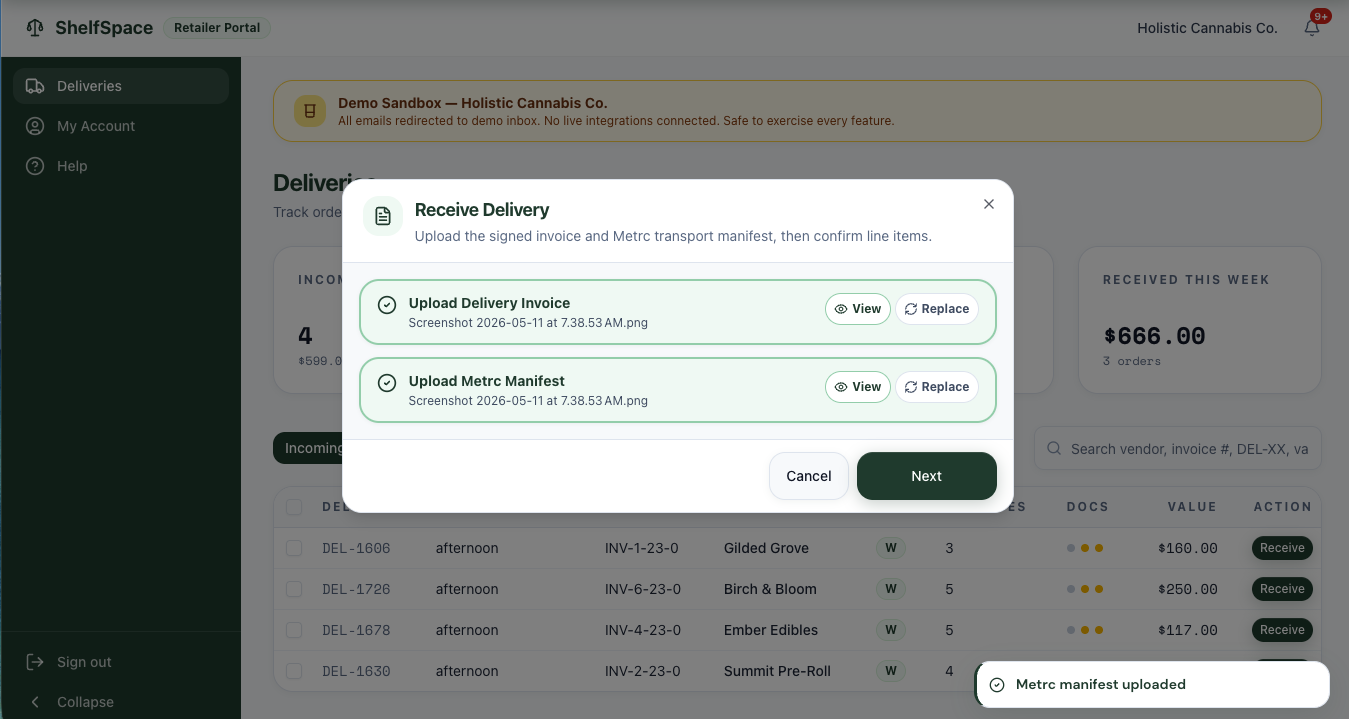
4a — Upload the signed invoice and Metrc manifest
The first step of receiving is attaching the two pieces of physical paper that came with the truck.
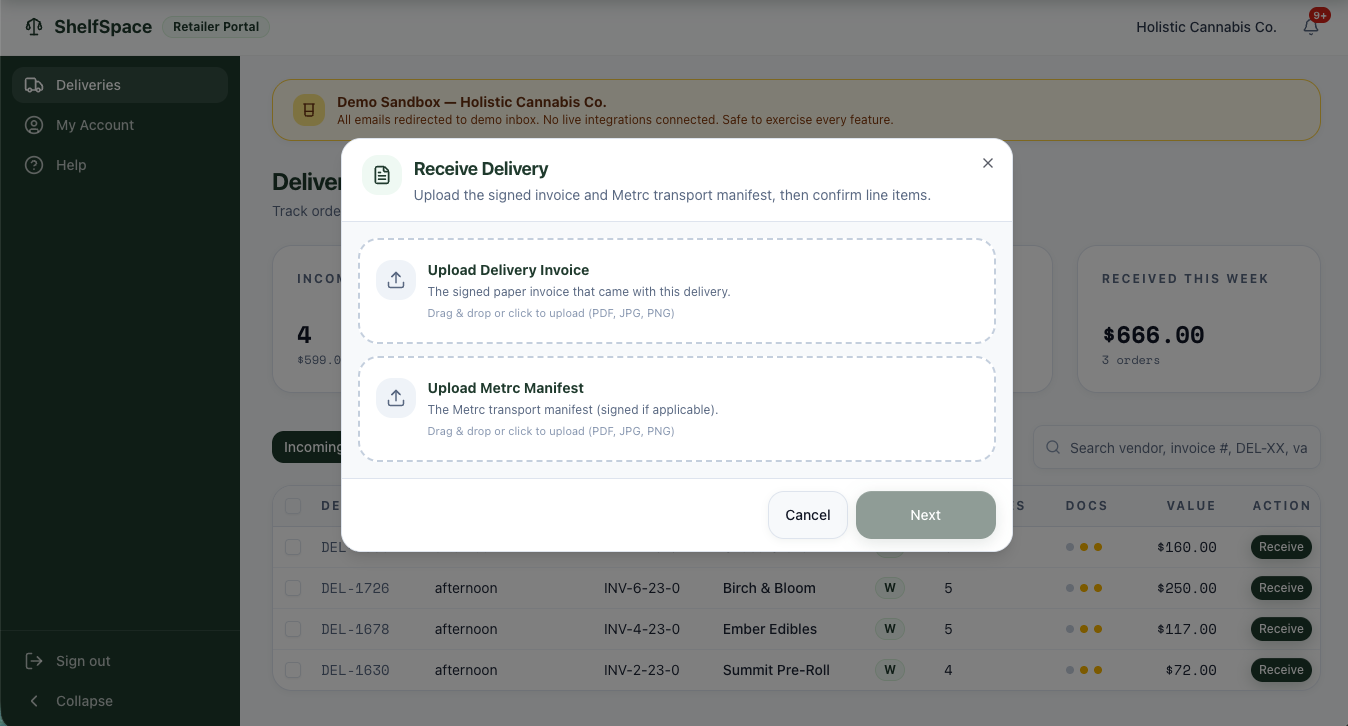
Both documents are required, and both matter. The signed invoice is your contemporaneous record of what the vendor delivered and what your team signed for. The Metrc transport manifest is the regulatory chain-of-custody document; keeping it on the delivery record means it's instantly findable for a compliance audit, and it ties the physical seed-to-sale record to your digital record of receipt.
4b — Confirm what physically arrived
The next screen shows every line item from the vendor's invoice next to a disposition picker and a received-quantity field.
If every line matches the invoice, click All match to accept them all in one click. If anything is short or damaged, set that line's disposition instead and Confirm.
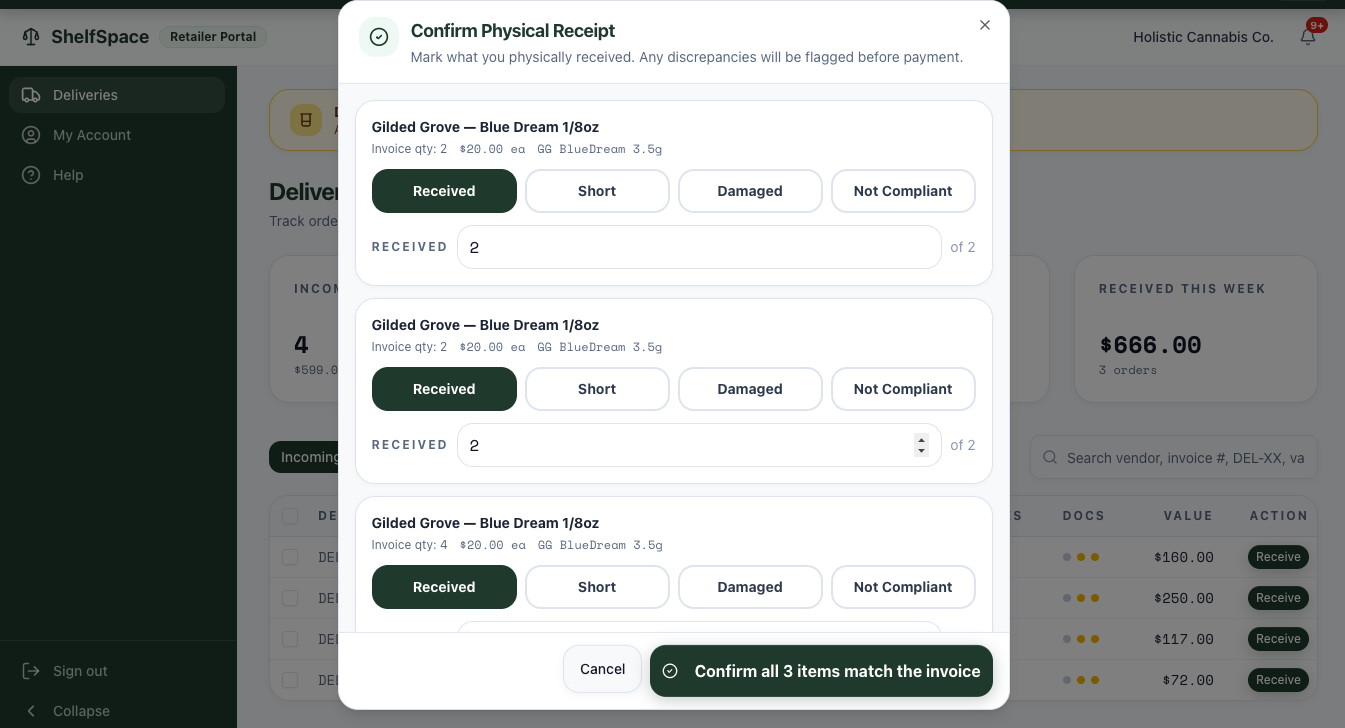
For every line, mark what actually happened:
- Received — the exact invoiced quantity arrived in good condition. This is the default state.
- Short — fewer units arrived than were invoiced. Drop the received quantity to what you actually counted.
- Damaged — units arrived broken, leaking, melted, or otherwise unsellable. Drop the quantity to good units only.
- Not Compliant — anything that fails compliance: mislabeled, wrong batch, COA mismatch, suspected contamination. Quarantine the affected product and return it to the vendor with the driver if possible.
Anything you mark other than Received opens a notes field. Write what happened and what you did with the product — for example, "two jars shattered in transit, returned with driver, photo taken with shift manager." Detailed notes here are gold during a vendor conversation, an audit, or a settlement dispute.
4c — Confirm the signed invoice total
The last step inside Receive is a single sanity check: does the dollar total on the screen match the paper invoice the driver signed?
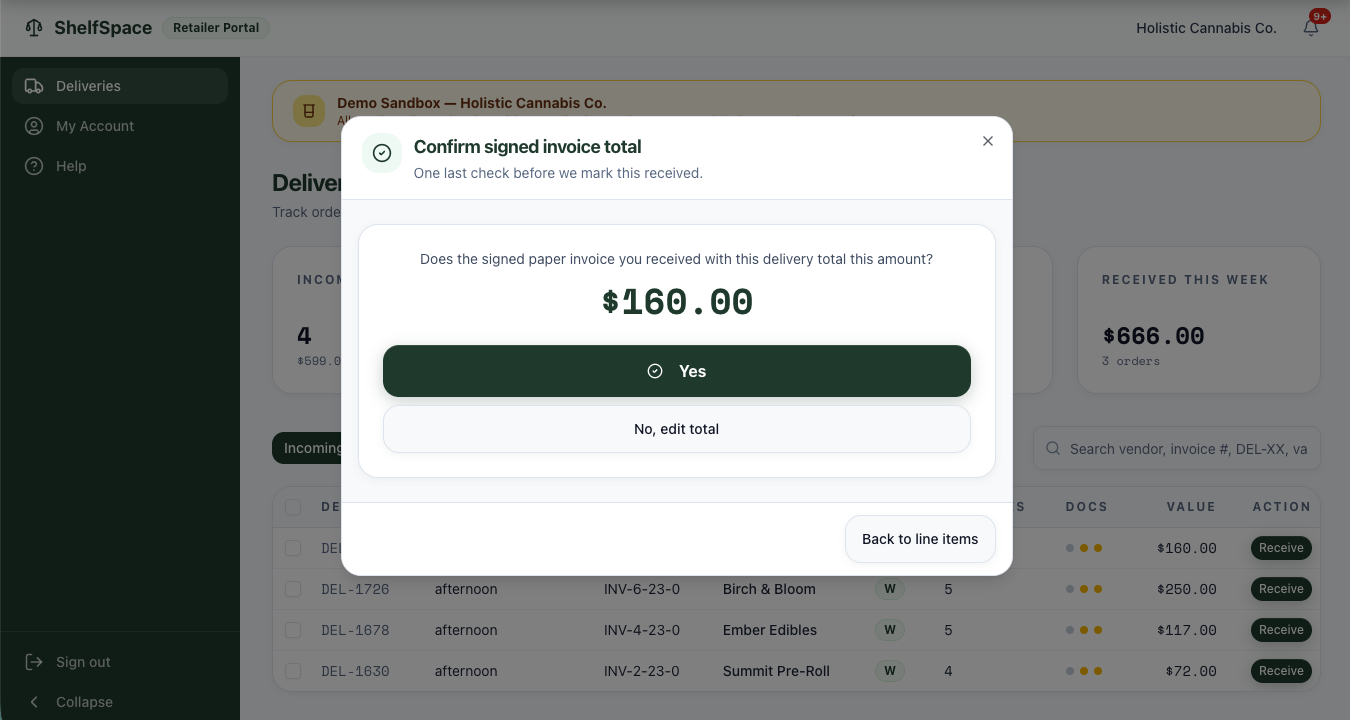
Click Yes if the screen total matches the signed paper invoice. The delivery flips to Received, and your role at the dock is done. Click No, edit total if there's still a mismatch — for example, the vendor's printed total is wrong, or there's a discount or promo line on the paper invoice the platform didn't catch upstream. You can edit the total directly, or step back to line items to fix dispositions you may have missed.
4d — Mark the consignment delivery complete
Confirming the invoice total flips the delivery to Received — but a consignment delivery has one more click. Open the delivery, click Review, then Mark Complete. You'll see "Marked as complete." (On a wholesale delivery that same button reads Mark as Reviewed; consignment is the one that says Mark Complete.) The delivery now feeds the settlement engine.
If a different person on your team is handling AP review rather than the dock receiver, the operator-facing role-based version of this SOP lives at How to Receive Cannabis Deliveries — Inventory Team SOP. The flow is the same; the SOP version has role-permission notes for stores where receiving and payment are separated.
Step 5 — From receipt to settlement
Once the consignment delivery is received, every SKU on it is now tracked individually in the platform. Every time a customer rings one of those SKUs at the register, the POS sale is matched back to the consignment delivery it came from. The platform handles the matching — there's nothing for you to reconcile.
At the end of each settlement cycle (weekly by default; biweekly or monthly per vendor), the platform pulls all consignment-tagged POS sales for that vendor, applies your configured profit split per category, deducts any aging-discount markdown for product that has been sitting on shelf past its tier threshold, reconciles waste and returns reported in Metrc, calculates the vendor's net payout, and generates a settlement report. The math is documented in detail in weekly consignment settlements and aging discounts and inventory markdowns.
The settlement lands in Payments → Consignment Payments on your dashboard, waiting for your approval.
Step 6 — Payday: Approve & Pay or Mark as paid externally
Click Payments in the left nav, then click the Consignment Payments tab. Each row is a settlement: vendor name, settlement period, net payout amount, status. Check the box next to the settlement you want to pay and click into the row to open the detail page. From there you have two paths.
- Check 21 payment cut and emailed
- QuickBooks sync — bill + check
- Vendor portal updated
- Per-check platform fee applies
- No check cut, no per-check fee
- No QuickBooks sync from this path
- Settlement marked Paid
- Vendor receives a stamped report
Approve & Pay is the one-click path: the platform cuts a Check 21 from the bank account you have on file, syncs the bill and the payment to QuickBooks if you have QBO connected, posts the check to the vendor's portal, and emails the vendor a full settlement report ending with the printable check page. The check is Check 21 compliant — the vendor can mobile-deposit it through any bank app, take it to a teller, or run it through a desktop check scanner. Every step is logged on the settlement record.
Mark as paid externally is the alternate path for retailers who'd rather route the payment themselves — through their bank's bill-pay, an ACH from their accounting system, or a paper check off-platform. The tooltip on the button reads: "Record an external payment (your own check / ACH / cash). ShelfSpace will not cut a check or charge a check fee." The platform records the resolution; the vendor's settlement report ends with a "PAID EXTERNALLY" stamp instead of a check page, so they know it's been paid even though no Check 21 was issued.
Recording your own check. Click Mark as Paid (External). In the "Mark settlement as paid externally" dialog, set Payment Method to Check and enter your check number in Reference — for a check the field even labels itself Reference (check #). Click Mark as Paid: the settlement flips to Paid, no Check 21 is cut and no check fee is charged, and the vendor's report ends with a "PAID EXTERNALLY" stamp. Changed your mind? Undo — mark as unpaid sends it back to Payments Due. Full detail: Approve & Pay vs Paid Externally.
Either path, the vendor receives the same five pages of settlement context — Settlement Summary, Sales Detail, Margin Analysis, Waste & Credits, Remaining Inventory — before the final check or stamp page. Same record, same numbers, same transparency. The difference is who routes the dollars.
Step 7 — The settlement report the vendor receives
Both paths produce the same multi-page Settlement Report PDF that ships to the vendor (and to their vendor portal). It's worth knowing what's on it, because the vendor will read it and may have questions.
The sample report above is a real settlement render from a demo-sandbox account (Holistic Cannabis Co. and a vendor called Summit Pre-Roll). The dollar amounts and SKU IDs are sandbox data — your live reports will reflect your own POS sales, your own splits, and your own vendors. Here's what each page does:
- Cover page — Settlement ID (e.g.,
SR-464), retailer name, vendor name, settlement period, and a Settlement Summary block showing Net Sales, Gross Vendor Payout, Waste Credits, Margin True-Up, and Net Vendor Payout side by side. Also a Remaining Inventory snippet showing how much vendor-owned product is still on shelf. - Sales Detail — the line-by-line breakdown of every SKU that sold in the period, with package ID, quantity, sale price, split percentage, and per-line payout. This is the page that answers "why am I getting paid this amount?"
- Margin Analysis — the discount reconciliation. Shows the Authorized Discount Budget (derived from your vendor's Operational Discount Budget setting), the Total Margin Shortfall (the actual discounts you ran at the register), and the Margin True-Up (the deduction from the vendor's share if you discounted past the budget, or $0 if you stayed within it).
- Waste & Credits — any product reported as waste in Metrc during the period, plus return credits, with a Total Waste Credit deducted from or added to the payout.
- Remaining Inventory — SKU-by-SKU rundown of what's still on shelf at period end, with on-hand quantity, inventory value at wholesale, days on shelf, and days until the next aging tier kicks in.
- Check page (Approve & Pay only) — a Check 21 compliant digital check, ready to print, with recipient instructions for mobile-deposit, teller deposit, and authenticity verification via QR code at
shelfspace.pro/verify. If you marked the settlement paid externally instead, this page is replaced with a "PAID EXTERNALLY" stamp.
For a deeper walkthrough of each section page-by-page, including the calculations behind the Margin True-Up and the aging-tier logic, see Reading Your Settlement Report and the blog post Anatomy of a Consignment Settlement Report.
What runs on the platform vs. what you run
The split between ShelfSpace and your team on consignment is deliberate. The platform runs the settlement engine — the POS ingest, the Metrc reconciliation, the per-vendor per-category split math, the aging-tier markdowns, the payment generation, the QuickBooks sync, the vendor portal, the settlement PDFs. You run the relationship — the vendor outreach, the contract conversation, any pushback on a specific settlement line, and the decision between Approve & Pay and Mark as paid externally. Consignment is a relationship business; the engine just makes the relationship clean to operate.